Looking for all Articles by Georgia McLellan?
How to design a character for animation
Former What's Your Story? participant, comic artist and full-time animation student Georgia McLellan shares her top tips for designing a character for animation.
Designing a character for animation is slightly different from designing a character for a book or comic. Animators need characters who are simple and easy to draw in all positions. Characters also need to be very eye catching, so the viewer is completely engrossed in the story.
Even if you’re not an animator, some of the techniques below can help you improve your drawing skills and create interesting characters.
So, let’s get started!
Start with shapes
Shapes have different connotations; curves and round shapes tend to be associated with friendliness and warmth, whereas sharp and jagged lines can give the impression of strictness, anger or excitement. When designing your character, start with shapes and build the details on top.
Once you have your character’s basic form, try redrawing it three times – each one being more exaggerated. This helps to clearly convey your character’s body and personality – making them as noticeable as possible.
Choose your colours
Colour will impact how the audience feels about your character and it’s an important step in conveying your character’s personality. If your character’s personality is very boring and dull, try using faded colours. Likewise, if they are very outgoing and confident, bright and saturated colours will work best.
Whatever you choose, remember to keep it simple! The fewer colours you use, the easier it is to animate.
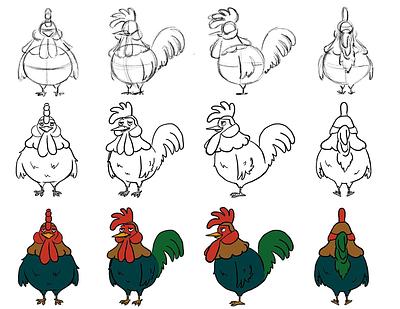
Create your turnaround
In animation, a turnaround is basically a guide on how to draw your character. To make one, you draw your character from the front, from the side, from the back and from a ¾ angle. This helps animators to keep their characters looking consistent.
Most turnarounds are done three times: Once with just the basic shapes that form your character (so that everyone knows how to start drawing them), secondly with only the black linework, and thirdly the complete, coloured character.
Draw the expressions
Now that you know how to draw your character accurately – it’s time to make them live! Most character designers will create an expression sheet next, which shows the range of your character’s facial expressions and emotions.
If you’re struggling to draw expressions, look at yourself in the mirror and try to exaggerate your emotions as much as possible. Look how your body tenses, or your face distorts, and try to show this in your character.
Don’t forget the hands!
We use our hands to express ourselves all the time; animators know this, so they pay close attention to what the character’s hands are doing. But for many artists, hands can be very difficult to draw! It’s helpful to draw your character’s hands doing various things such as waving hello or gripping onto a wand. This way, it’s very easy to animate them when the time comes.
The final line up
Once you’ve designed several characters, make sure to line them all up on one page. Not only does this help to judge their proportions in comparison to one another – it also helps you to see if they all go together. After all, they’re all in the same universe, so their style should be consistent.
Remember, animation is all about exaggerating and showing emotion. It can be a great opportunity to have fun and really push your characters!
So, grab your pencil and get designing!